Categories
SewMyStash

Winner for SewMyStash2015 Weekend Challenge 1!

Hi friends! I just wanted to post here that a winner of the giveaway was chosen via the random number generator! It was Teresa Moran or @nanamoran11 on Instagram! I also want to point out that I did include those of you who linked up on the blog post too!

Photo Jan 26, 8 49 15 AM

Also wanted to share MY project for the weekend sew.. though of course I didnt enter the contest ;). I had a very large tea towel I bought from Ikea in the fall intending to turn it into 2 envelope pillow covers for my couch… and I DID! It feels so great to make something I actually intended to make… and on time!

Photo Jan 20, 8 17 46 PM Photo Jan 24, 4 11 34 PM

Thanks for participating and congrats to everyone who got some great work done! Stay tuned to the hashtag and the blog– there are many more posts and fun things to come!

XOXO

Leasa

Categories
SewMyStash

SewMyStash2015 Weekend Challenge 1

Welcome to the first challengeย for SewMyStash2015! I’ve called it a weekend challenge, even though it starts on a Monday. I didn’t want to leave out any sewers who primarily sew during the week (ie: stay at home moms, part time workers, or work at home moms). Also, it gives everyone fair time to pull their fabric and work out their ideas for the project. Ok, ready!?

It’s a Valentine’s day challenge! Rules:

1. You must incorporate hearts! That could either reflect in the project/pattern you chose, or some Valentine’s Day fabric you have in your stash.

2. You may sew any project you like: mini quilt, bag, purse, clothing, pillow, anything!

3. You need to finish (basically) by the end of the weekend of Jan 25th (Sunday). I say basically, because I don’t want to encourage someone starting a queen size quilt that they can’t finish. The point of the challenge is to get a quick project done, using your stash and therefore making you feel awesome about yourself!

4. You must use approximately 75% from your stash. That pretty much means only backing or binding or that sort of thing can be new. Extra points if you use 100% stash! (Extra points can only be redeemed for pats on the back)

5. Use the hashtag #sewmystash2015challenge1 on your finished project! There will be a giveaway…. of some sort… and I will be using the images in that hashtag as entries.

That’s it! Need some ideas?

Robert Kaufman’s Pixelated Heart pattern is an awesome modern take on the heart shape. The pattern is for a full sized quilt, but its super easy to reduce for mini quilt or pillow size. And its free! Get it HERE.

Screen Shot 2015-01-19 at 7.35.10 AM

Cluck Cluck Sew just posted a tutorial for an ADORABLE heart quilt pattern! Omg it’s the cutest. It makes me think of candy hearts. See it HERE.

heartquilt

EmilyAnnsKloset has a great simple pattern for a Candy Hearts quilt that could easily be reduced for this challenge. Get her pattern HERE. (She is @emilyannskloset on Instagram)

Screen Shot 2015-01-19 at 8.17.15 AM

I’ve always loved Canoe Ridge Creation’s XO quilt… (for some reason her site isnt working for me. Try HERE.)

XO quilt tutorial.

You can get your paper piecing on with this LOVE tutorial on Sew Mama Sew.

TLKelly2

Don’t forget to look around on Pinterest if you need more ideas! You can use hearts in anything! Totes, mug rugs, sew together bag, pillow covers.

Screen Shot 2015-01-19 at 8.42.26 AM

I cannot wait to see what everyone creates!

ok, GO!

XOXO Leasa


Categories
SewMyStash

SewMyStash2015: Getting Past Quilter’s Block

Hello SewMyStashers! By now, you should be into your first project (at least) using your stash! I am a little behind because I need to finish up my #DisneyQuiltSwap2015 mini quilt, and then I’m all aboard!

I wanted this post to focus on getting over the quilter’s block. What I mean by that is similar to writers block. You have fabric you want to use, but are not sure the best project or pattern to showcase it the way it deserves. OR you have a pattern you have always wanted to make but are not sure which fabrics to use. I’m going to show you some of my approaches and I hope they help you!

Pinterest!

Pinterest is my usual go-to. I like to see what others have done with that fabric or the pattern! It gives me great ideas! For example, I have always wanted to make a quilt showcasing my Heather Ross fabrics. So I search for fabric + “quilt” or “pillow” etc. Pretty straight forward. Think about the fabric you are using. Heather Ross fabric is novelty and has lots of character in her illustrations. You wouldn’t want a pattern that cuts it up a lot. Something with fussy cutting would be the best way to showcase. A polaroid pattern or monkey in the middle… or a churn-dash. You get the idea.

Screen shot 2015-01-02 at 10.38.44 AM

You can use the same approach for a pattern you like but are not sure which fabrics would be good. Ive always wanted to do a plus quilt so here are search results that I might be interested in.

Screen shot 2015-01-02 at 10.45.08 AM

Now I can see that an all-over print or solids would be fabulous for a plus quilt. Also, don’t forget to check your own quilting pinboard! There is a reason you pinned a million quilts over the past few years. Rekindle your love for past inspiration.


Pattern Books!

We both know you have a stack of quilt books that you bought during sales at your LQS or received as gifts. Its time to break them out! Challenge yourself to chose patterns that maybe don’t catch your eye. Sometimes, the fabrics used in those patterns are not everyone’s taste. You know you can do a great pull from your own stash, so don’t let their choices throw you off of a good pattern ๐Ÿ˜‰

image

Hashtags!

I do the same with hashtags as I do with Pinterest! I just search using the fabric collection name or the designers name… or the type of quilt pattern! Quick and easy when you’re mobile! Just take a screen capture and you’re all set.


Really that’s it! Look for inspiration everywhere, challenge yourself to use an “ugly” quilt pattern, use those pattern books, and consult the quilty community! How do YOU get past quilter’s block? Share with us in the comments!

Thanks for reading!

Leasa


Categories
SewMyStash Uncategorized

SewMyStash2015 Widget!

Hey!! I was resourceful and made my own widget! Go me! First, click the post title above to get into the post. Copy the pink/red text below and paste it on your blog in the side bar/widget area! You will get the main image I created/posted on Instagram and the clickable photo will take you to the SewMyStash posts here. Thanks for the support!
<a href="http://www.projectleasa.com/category/sewmystash2015/">
<img src="http://www.projectleasa.com/wp-content/uploads/2014/12/IMG_0279.jpg"
width="150" alt="Details from ProjectLeasa"></a>

Leasa

Categories
SewMyStash Uncategorized

#SewMyStash2015 Kickoff

Welcome to the kickoff blog post for Sew My Stash 2015!

This past few years I have spent lots of time sewing many projects… for others. I have been collecting amazing fabrics with the intention to sew some great things for me and my household. Repeatedly, I kept meaning to use them, but other projects always came first. But my stash was steadily growing. Last week, I finally decided that in 2015 I wanted to sew those pretties in my stash that are collecting dust. I thought a few people might be interested in taking this challenge on, so I posted about it on Instagram. Within 3 days I had almost 500 extra followers and hundreds of ‘likes’ and reposts on my Instagram image. So here we are! I’m excited and overwhelmed to be heading up this challenge for so many, but I say lets do this!

IMG_0279.JPG


For the blog. The #sewmystash2015 hashtag on Instagram

I plan to write blog post every 3-ish weeks, encouraging and reviewing how it seems to be going for the masses, as well as addressing various topics and issues that might come up with trying to focus on sewing your stash. And, as a heads up, July will be all about sewing your Christmas stash! So save those projects for then if you want to participate!

Getting Started:
I think we should first think of the ways you can use up you stash. I like the idea of thinking about what kind of sewing you should do more of? Do you sew for others all the time? Focus on yourself this year. If you do lots of selfish sewing try thinking some things up for others or even charities! Maybe you have an online shop… make more things for the shop! Try sewing some new products and offer them at competitive rates. That’s a good way of getting some revenue in place of your stash, something many are interesting in doing. Especially if selling your sewings helps pay for more pretties. I personally sew for others all the time. I would like to focus on sewing for me as well as adding finished products to my Etsy store.

Your Stash:
Don’t be embarrassed, be honest and excited! Don’t worry about wondering if you’re a hoarder or not. Just get going one at a time. For those of you with insane unorganized stashes, I don’t think I would suggest organizing as a first step. I think we all need to get a completed project, sewn from the stash, under our belts to feel accomplished! So I say start with something that is an easy completion or that you have already had a plan for and just need to execute. Don’t begin with your most coveted fabrics and the most difficult pattern ever with all kinds of techniques you have never done. Just get started and get one complete and then go from there.

Rules:
First, I want to say that FABRIC DIETING IS NOT REQUIRED. That’s up to you if you want to limit your fabric purchasing. If you’re in on the fence about it, maybe decide that for every project finished you permit yourself to buy some more. I didn’t start this with the intention to whittle down your stashes to nothing. I focused on getting everyone to actually use the things they bought.

I do suggest that for each project you try to get 50% of your needed fabric from your stash. I think quilt backings, solids, backgrounds will commonly need to be bought.

What to do next:
If you haven’t already posted a photo of your stash on the hashtag, start there. Otherwise, start posting photos of your pulls for your first project. Don’t forget to tell us about it! Also, feel free to blog along and link up here so others can see what you’re up to.

I think that is all! Keep using the #SewMyStash2015 hashtag and thank ALL OF YOU so much for loving my idea and challenging yourselves along with me!

Cheers!
Leasa

Categories
Finished Projects

The Oh-So-Epic Mid Century Mod Quilt

The Mid Century Modern Quilt…. over a year in the making… blood, sweat, and tears…. fully improv.. and oh-so intimidating! But, its finished and I love it and its amazing.. and the client thinks so too. But I want to share its journey with you!

The client who commissioned it was an awesome pocket-friend mama I met via Instagram. We chatted about it a lot and both of our excitement was palpable! I got started right away chosing fabrics and drawing up some design concepts!

Designing @cashelsmama's quilt in Levi's room while he naps. Yes, I'm still in my pajamas..

I worked on the diamond pieces for the mid century mod #quilt. #impromptuquilting

I've been piecing. #midcenturymodern #quilt

It wasn’t long before I started to feel a little direction-less and that perhaps I should’ve drawn up an actual pattern. But I pressed on, hoping it would start to come together on its own. So I began laying it out, piecing it together, and rearranging, and piecing, and more rearranging… you get the point.

badquilt1

The most tedious areas of the mid century modern quilt are pieced! Yay! #quilting #impromptupiecing #nopattern

I pretty much got almost all the way done with the quilt top when I decided to be honest with myself. The quilt was not coming out how I envisioned it. And I didnt want to send something I wasnt happy with. So, I did a lot of thinking. First, I felt the quilt needed some larger shapes to help ground it. Also, I did really like a lot of the individual improv piecing I did so I wanted to keep a lot of them.

Next, I took a deep breath and CUT THE WHOLE QUILT TOP UP INTO 20 PIECES! Daring, I know, but I was up to the challenge!

I took photos of each of the cut pieces and brought them into Photoshop and started creating a new quilt top.. digitally. This is what I ended up with!

Screen shot 2014-12-24 at 11.41.14 AM

After that, the quilt came together pretty quickly and my excitement for it was renewed. In a few weeks, the top was pieced and it was ready for the long arm for quilting. I chose an all-over mod design and the most perfect backing!

What I've been working on lately!

What I've been working on lately!

And the final product photos!!!!!!

More project photos for the blog

More project photos for the blog

More project photos for the blog

More project photos for the blog

More project photos for the blog

More project photos for the blog

And I sent her some coasters as a “thank you for your year-long patience”.

More project photos for the blog

Well, that’s it! I hope my awesome client Amanda felt it was worth the long wait ๐Ÿ™‚

All my quilt commissions are done. Ive been doing a few swaps, but I think the new year might bring a different desire. Stay tuned!

Leasa

Categories
Finished Projects

Harry Potter or Die

If you don’t know already, I am a big Harry Potter fan! I mean… I was trying to convince my husband to consider the name Sirius for our son! No joke. He became Levi, obviously, but I have already stated if the next child is a boy, Sirius just might be his middle name ๐Ÿ˜‰

So, when I caught wind of a Hogwarts handmade swap on Instagram I had to join!

The partner I got answered her questionnaire pretty thoroughly. From it, I could tell she liked the creatures of the wizzarding world and identified mostly with Ravenclaw or Gryffindor. She requested either a mini quilt or something she could wear like a bag or a scarf. I always love fan gear that is subtle and clever, as opposed to overly marketed looking. The clever things you can sport and enjoy on a regular day, not just at a theme park.

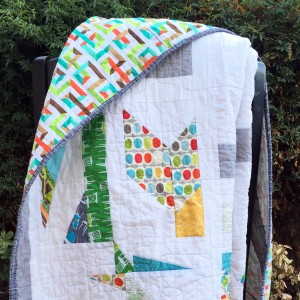
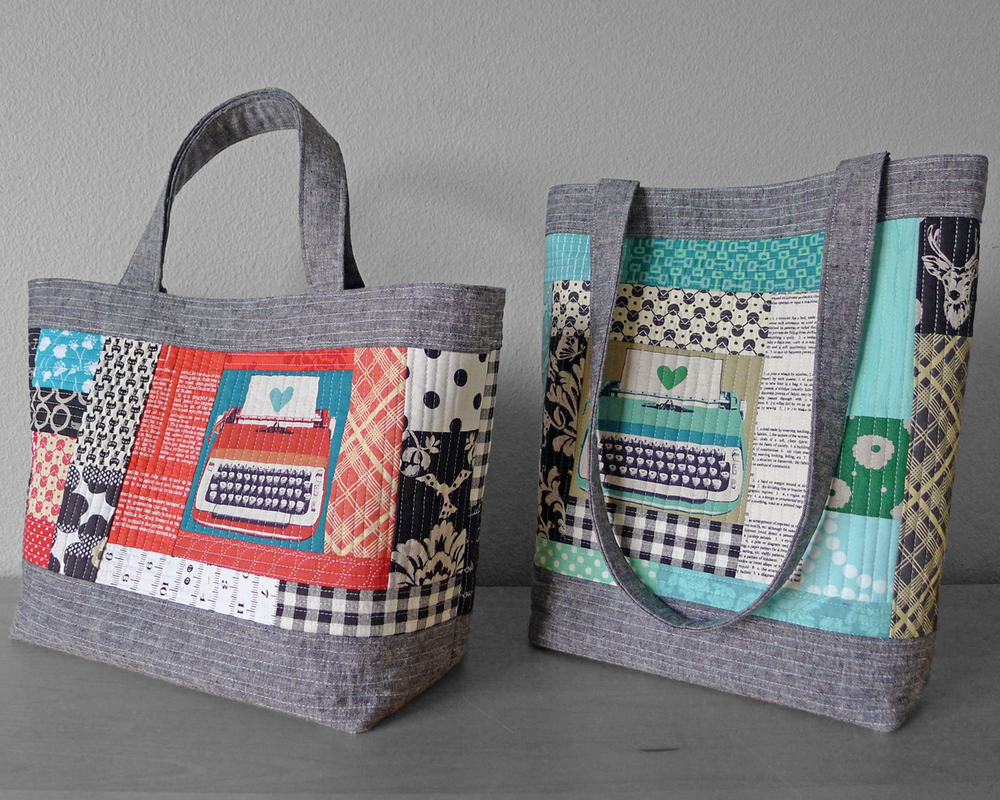
I had seen this amazing bag pattern from Elizabeth Hartman called the Perfect Quilted Tote. The scrappy nature of it really caught my creative eye.

PQTshop

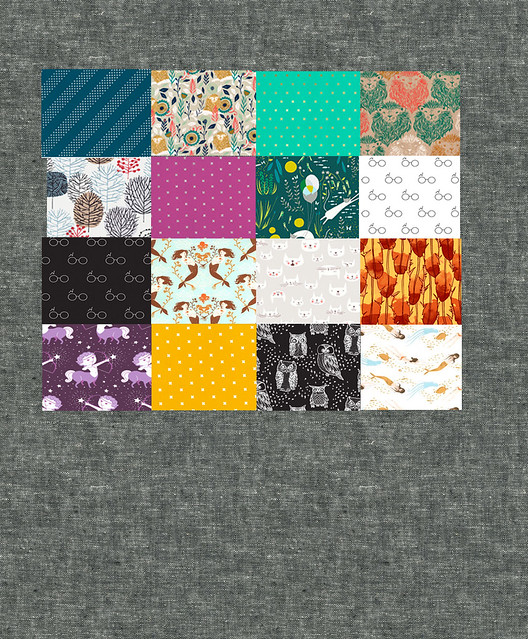
I went to my stash first, looking for whimsy, which I have a lot of thanks to the gorgeous prints of Heather Ross.

What I've been working on lately!

I decided to add some Lizzy House and Cotton and Steel to the pulls. Lizzy House is whimsical too and Cotton & Steel has a great line out right now with perfect colors and an even more perfect mix of whimsical lions and more graphic/clean prints to balance the bag and make it more modern with a hint of hipster.

More project photos for the blog

I really loved where this was going, but I knew I needed a little bit of Harry Potter to ground it to that world. Official licensed fabric is often less-than-amazing, so I went to the best place for unique designs: Spoonflower!

More project photos for the blog

How great are those glasses/scars!? And that repeating print of Harry Potter book covers are just amazing! I was also excited to find great prints of owls, phoenix feathers, and centaurs! You can’t buy those in a store!

And, it started coming together just divinely! I used Photoshop to get a rough idea of how these fabrics felt together.

What I've been working on lately!

More project photos for the blog

I declare right here and now… I LOVE the quilt-as-you-go technique!
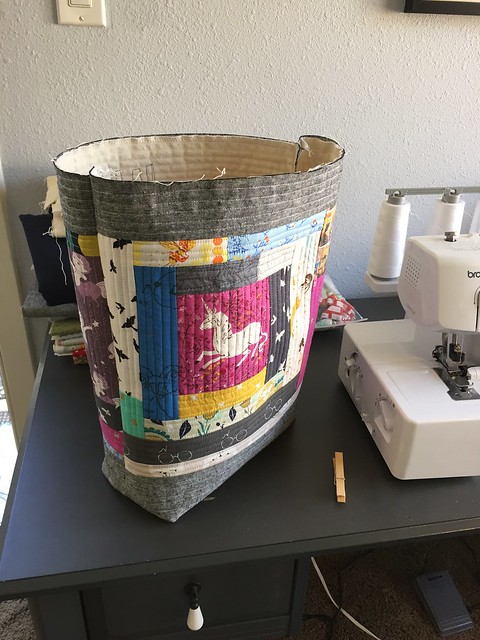
More project photos for the blog

One side finished!

More project photos for the blog

Next side!

More project photos for the blog

More project photos for the blog

And here is the outside of the bag, assembled.

More project photos for the blog

More project photos for the blog

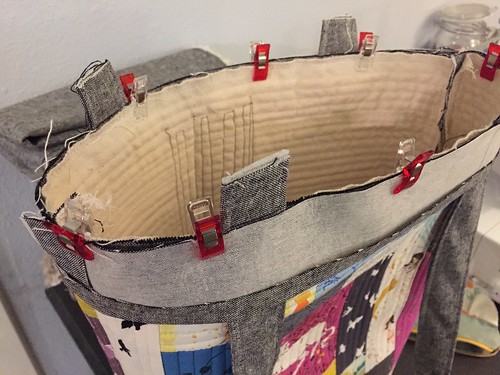
Next up, the bag lining.

More project photos for the blog

More project photos for the blog

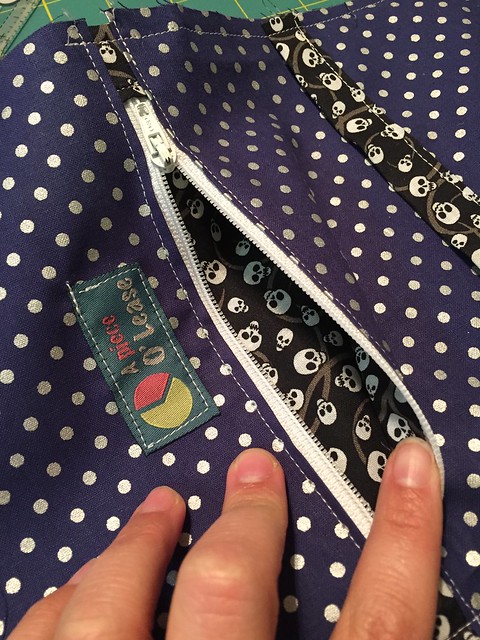
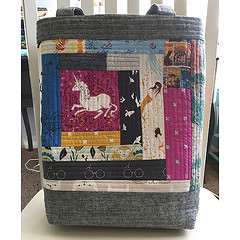
I lined the pocket with skulls because, as Sirius says “we all have both light and dark inside of us”. I know, nerdy. But cool, right!?

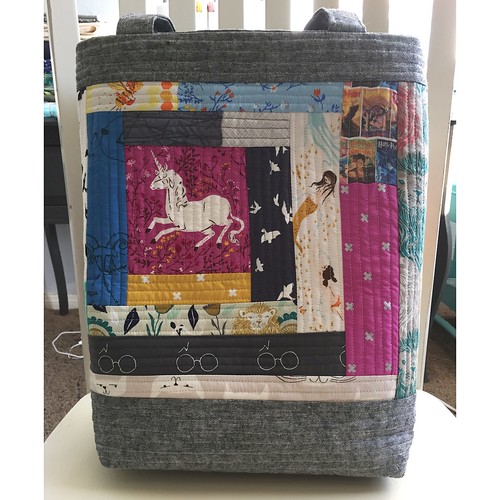
And the finished bag!

More project photos for the blog

More project photos for the blog

I ordered this little leather tag from a shop on Etsy. I wanted the bag to feel like it was purchased in Diagon Alley or Hogsmeade.

More project photos for the blog

I loved this bag so much that I cut the main bag pieces again to make one for myself!

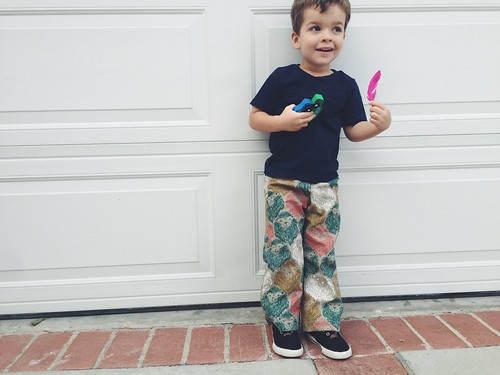
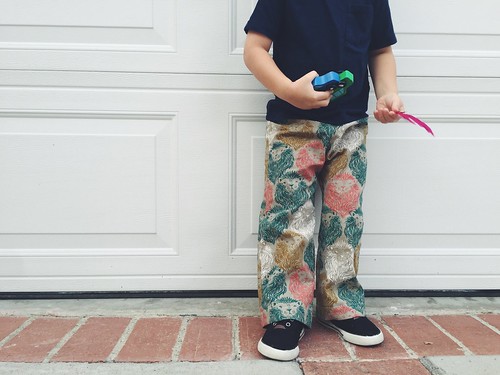
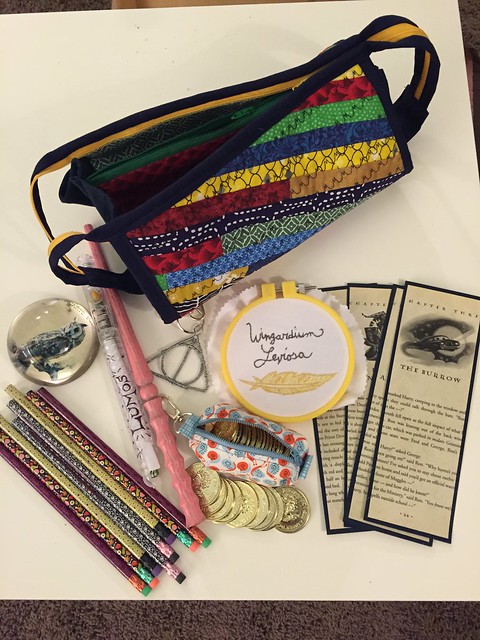
Want to see what I got?? I was given an awesome Sew Together bag in various Hogwarts colors, an awesome needlepoint, and many goodies including a pink wand! Ahhhh!

More project photos for the blog

More project photos for the blog

More project photos for the blog

That night, I tried to turn my son into a tea cozy ๐Ÿ˜›

Leasa


Categories
Finished Projects

Potty-Friendly Pants

Potty training… the word and world I had been dreading since Levi was approaching 2 years old. Everything made it sound like such a drag… and all the different methods even more so. Because of Levi’s developmental delay, I resolved myself to accepting that it may not happen until closer to 4, but I vowed I would not force it! To my great pleasure, he potty learned about 2 weeks before turning 3 years old with little effort! Hooray! But I quickly noticed that he didn’t really have the wardrobe to support potty learning. Girls have cute leggings at their disposal, and they are perfect for any and all occasions. But for some reason, the majority of boy’s bottoms have buttons and zippers. There are a few elastic jeans happening over at Target, but they leave much to be desired and would leave us with only a variety of 2 pants styles to choose from. Not to mention, the elastic was still a little stiff for a kiddo still mastering the pulling up and down. So… mama decided to make some.

I decided I wanted to buy a pattern. Something pre-tested and perfected because I didn’t want to waste time with the trial and error of my own pattern or some freebie blog tutorial (no diss on those, many are great!). Well, it didn’t take long for me to learn that no pattern was likely to be perfect. I had chosen the “Kids Shorts” pattern by Dana of DanaMadeIt because it came with a variety of shorts styles, though I really only wanted to bother with basic for now. I adapted her pattern slightly. I chose the 5Y pattern pieces because there didn’t seem to be enough room in the butt for the 3Y or 4Y (I learned how to fix that later). I cut the length to the 4Y and used the 2Y waistband elastic size. Levi is narrow with no pudgy belly, very straight, and a bubble butt. I wish I could describe myself the same way! Ha!

With only a little bit of trial and error, I found the combo that worked out. It was interesting to look for fabrics well suited for clothing as opposed to quilts but I really enjoyed it! Check them out! Most of the fabrics purchased from Sew Modern, my fave local quilt shop.


Shorts I made for Levi! Potty learning friendly w not too tight elastic

Shorts I made for Levi! Potty learning friendly w not too tight elastic

What I've been working on lately!

Mama made shorts uploading for the blog!

Mama made shorts uploading for the blog!

Mama made shorts uploading for the blog!

And some candid shots of days when he wore them ๐Ÿ™‚

Mama made shorts uploading for the blog!

Mama made shorts uploading for the blog!

^those are one of my favorites. I took care to cut them so the row of castles would line the hem.

As cooler temps rolled in, I knew the boy would need pants too! This time I used a free pattern for pants also from Dana of DanaMadeIt but I looked up how to give more room in the butt instead of doing so much altering. I found a great “cheat sheet” so to speak on making adjustments to patterns (here). It worked perfectly! Check out the pants!

I will start with my all-time favorite pair!

The pants! Uploaded for the blog!

The pants! Uploaded for the blog!

The pants! Uploaded for the blog!

The pants! Uploaded for the blog!

The pants! Uploaded for the blog!

I’ve taken far fewer modeling-type shots of the pants… we needed to start using them right away!

The pants! Uploaded for the blog!

The pants! Uploaded for the blog!

The pants! Uploaded for the blog!

I’ve got a few more to make from fabric I just bought this weekend. In the Spring, I will probably convert them to shorts! I really love them and I get so many compliments on the style of his pants! Its really fun to add edge and interest to his wardrobe. Boys clothes usually look so plain or too dressy like Sunday-best. Many have asked if I make and sell them! I am considering it…. but I would need to draft my own pattern pieces for other sizes. But, maybe someday someone will write a blog post about my pattern and how they too had to alter it some ๐Ÿ˜›

Leasa

Fabrics used: Lizzy House. Robert Kaufman’s Essex, Chambray and Flannel. Cotton and Steel. Art Gallery Fabrics.